Crochet Succulent Pattern: Free Rosette, Cactus and Pot
Crochet a mini garden that never needs watering: an echeveria rosette from three stacked layers of petals, a ribbed barrel cactus and a terracotta pot with soil. A free beginner pattern with every round counted.
By AlixaPublished 9 min read
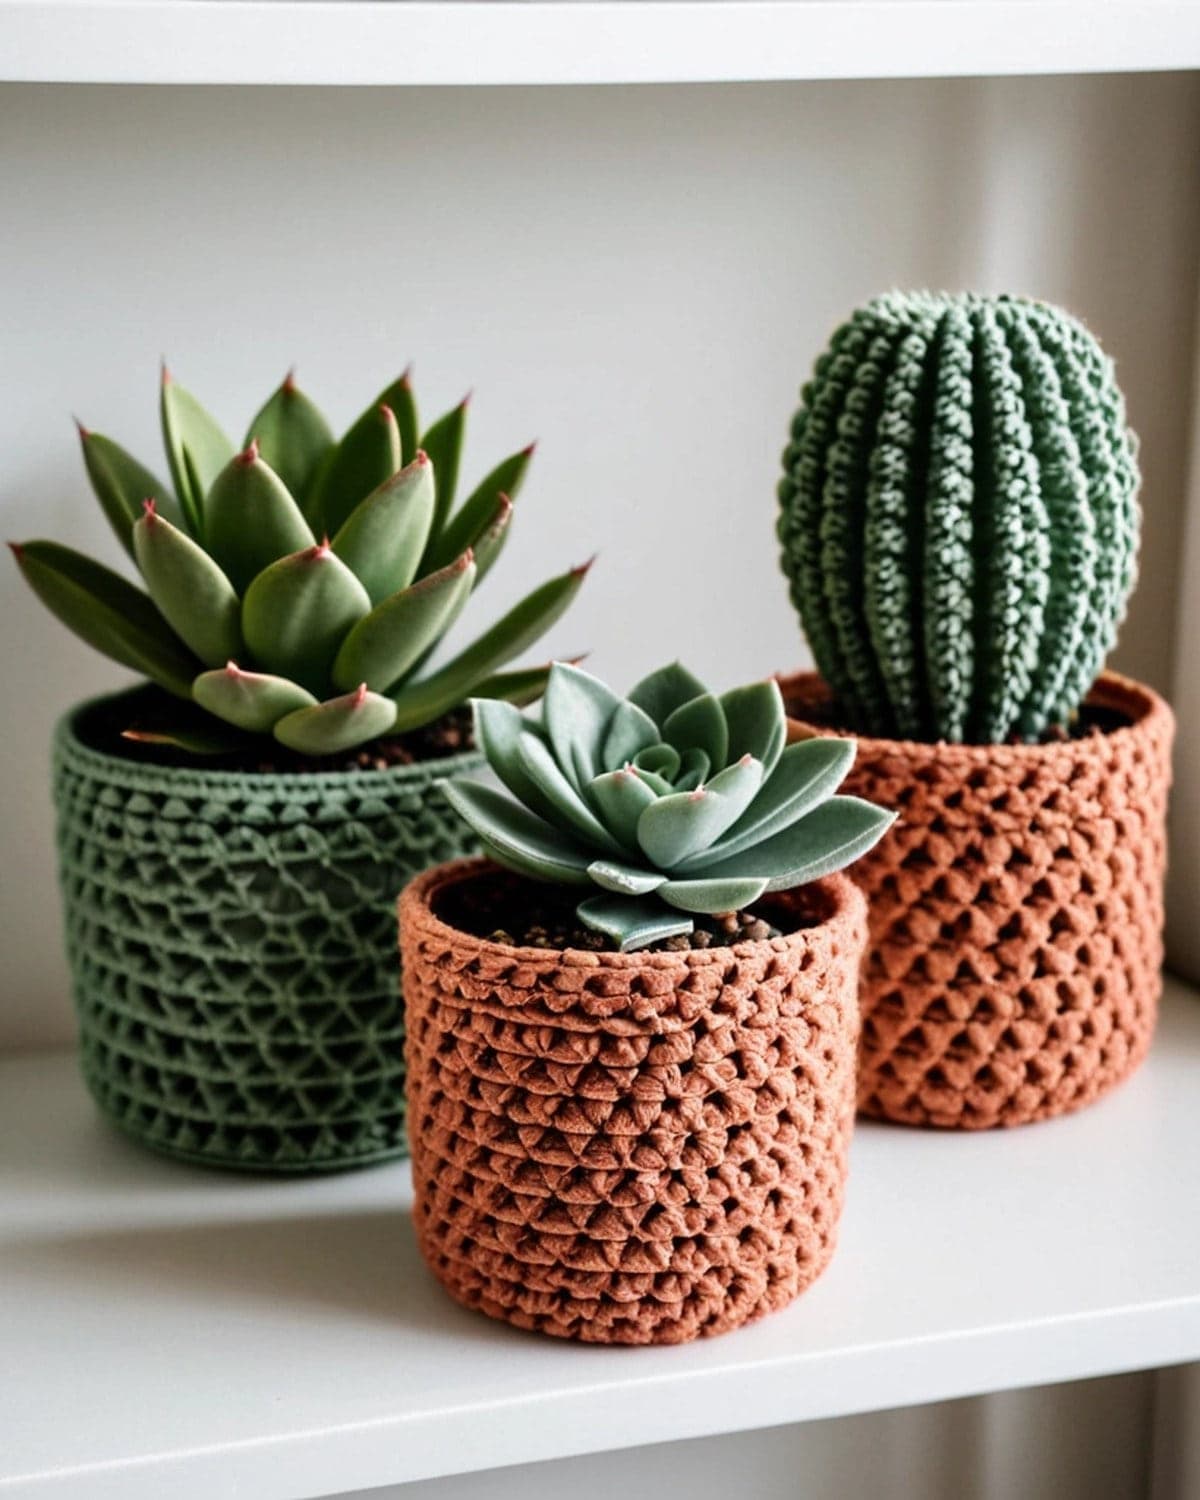
Crochet succulents are the houseplants that never need watering. They sit happily on a desk, a windowsill or a bookshelf, they make sweet gifts for plant lovers, and each one uses only a little yarn. With three easy shapes, a rosette, a ribbed cactus and a tiny pot, you can fill a whole shelf with a mini garden.
This free crochet succulent pattern gives you an echeveria rosette made from three stacked layers of petals, a ribbed barrel cactus worked flat and gathered into shape, and a terracotta pot with soil to plant them in. You'll also find flowers and spines for the cactus, colour ideas, size changes and tips for neat, firm plants. Every round has its stitch count.
Terms used here: US crochet terms. Single crochet (sc) is UK double crochet, half double crochet (hdc) is UK half treble, double crochet (dc) is UK treble and treble crochet (tr) is UK double treble.
About this pattern: it's a simple design written for this guide. Each round's stitch count has been checked. Finished sizes are approximate.
At a glance
| Skill level | Beginner |
| Stitches | Magic ring, ch, sl st, sc, hdc, dc, tr, back loop only (BLO) |
| Yarn | Worsted (weight 4) cotton or acrylic in greens and terracotta |
| Hook | 4 mm (US G-6) |
| Finished size | Rosette about 8 cm (3 in); cactus about 7 cm (2.75 in) tall |
| Pot | About 7 cm (2.75 in) across and 6 cm (2.5 in) tall |
| Time | 30 to 45 minutes per plant, plus the pot |
What you need

- Worsted yarn (weight 4) in sage or mint green for the rosette, a darker green for the cactus, terracotta for the pot and brown for the soil. Small amounts of pink or white for flowers and spines. Cotton gives the crispest plants.
- A 4 mm (US G-6) hook. Use a hook a little smaller than the label suggests, so the fabric is firm and the stuffing doesn't show.
- Polyester fibrefill for stuffing.
- A few spoonfuls of plastic pellets, dried beans or a small stone to weigh the pot down (optional, not for toys for small children).
- A tapestry needle, scissors and a stitch marker.
Techniques used
- Magic ring. See how to crochet a magic ring.
- Increase (inc) and invisible decrease (dec). Two stitches in one stitch, and two stitches worked together through the front loops only. Both are explained in amigurumi for beginners.
- Back loop only (BLO). Working into only the back loop of each stitch leaves a ridge. It makes the ribs on the cactus and the sharp edge at the bottom of the pot.
- Picot. Ch 2, then sl st into the first chain. It makes the pointed tip on each rosette petal.
Pattern 1: Echeveria rosette
The rosette is three flat flowers of different sizes, stacked on top of each other with the petals offset. Each layer is a tiny circle with petals worked around it.
Small layer (5 petals)
- R1: 5 sc in a magic ring. Don't join.
- R2 (petals): in each stitch around, work (hdc, dc, picot, dc, hdc). (5 petals)
Slip stitch into the first hdc and fasten off with a long tail.
Medium layer (5 petals)
- R1: 5 sc in a magic ring.
- R2: inc in each stitch around (10)
- R3 (petals): each medium petal uses 2 stitches: (hdc, dc, tr) in the next st, picot, (tr, dc, hdc) in the next st.
Work 5 medium petals around the 10 stitches. Slip stitch into the first hdc and fasten off.
Large layer (6 petals)
- R1: 6 sc in a magic ring.
- R2: inc in each stitch around (12)
- R3: (sc, inc) × 6 (18)
- R4 (petals): each large petal uses 3 stitches: (hdc, dc) in the next st, (tr, picot, tr) in the next st, (dc, hdc) in the next st.
Work 6 large petals around the 18 stitches. Slip stitch into the first hdc and fasten off.

Assembling the rosette
- Stack the layers with the largest at the bottom, the medium in the middle and the small one on top.
- Turn each layer so its petals sit between the petals of the layer below.
- Sew through the centres of all three layers with the long tail, going up and down a few times, and pull firmly. The petals of the upper layers will lift and cup upwards.
- Shape it. Pinch the tips of the petals and curve the small layer inwards, like a closed bud.
For a realistic blush, use a variegated green-to-pink yarn, or add a round of pink sl st around the edge of the large layer before you fasten off.
Pattern 2: Ribbed barrel cactus
This cactus is made flat, as a little rectangle of ribbed rows, then seamed into a tube and gathered at the top and bottom. The rows of back loop single crochet make vertical ribs, just like a real barrel cactus.
The ribbed rectangle
Use dark green.
- Foundation: ch 13.
- Row 1: sc in the 2nd ch from the hook and in each ch across. (12)
- Rows 2 to 22: ch 1, turn, sc in the back loop only of each st across. (12)
Don't fasten off. The rectangle is about 7 cm (2.75 in) tall (the 12 stitches) and 11 to 12 cm (4.5 in) long (the rows).
Shaping
- Seam. Fold the rectangle so the first and last rows meet. Slip stitch them together through both layers, to make a tube. The ribs now run up and down the cactus. Fasten off with a 30 cm (12 in) tail.
- Gather the top. Thread a needle with yarn and weave it in and out of the row ends around the top edge. Pull tight to close, and knot.
- Stuff the tube firmly through the open bottom.
- Gather the bottom the same way, but don't pull it completely closed if you'll sew it into a pot.
Squeeze the cactus gently into a round barrel shape.

Spines and a flower
- Spines: with white or cream yarn, make short straight stitches in small V shapes along each rib, about 1 cm (0.4 in) apart. Or use a single strand of white embroidery thread for finer spines.
- Flower: with pink, make 5 sc in a magic ring, then (sl st, ch 3, sl st) in each stitch around for 5 tiny petals. Sew it to the top of the cactus.
Pattern 3: Terracotta pot with soil
The pot
Use terracotta. Work in a spiral.
- R1: 6 sc in a magic ring (6)
- R2: inc in each stitch around (12)
- R3: (sc, inc) × 6 (18)
- R4: (2 sc, inc) × 6 (24)
- R5: (3 sc, inc) × 6 (30)
- R6: sc in the back loop only of each stitch around (30)
- R7 to R13: sc in each stitch around (30)
- R14: sc in the front loop only of each stitch around (30)
- R15 and R16: sc in each stitch around (30)
Slip stitch into the next stitch and fasten off. Fold rounds 14 to 16 down over the outside of the pot to make the rim. The front loop round makes it fold neatly.
The soil
Use brown. Make a flat circle the same size as the bottom of the pot:
- R1 to R5: as rounds 1 to 5 of the pot (30)
Slip stitch and fasten off with a long tail.

Planting
- Stuff the pot firmly. For a heavier pot that won't tip over, put a small bag of pellets or a stone in the bottom first.
- Sew the soil to the top round of the pot (round 13, under the rim), with the right side up, using whip stitch.
- Plant your succulent. Place the rosette or cactus on the soil and sew around its base with the tail, catching the soil.
Making a succulent arrangement

- A trio on a shelf: one rosette, one cactus and a second rosette in a different green, each in its own pot.
- A planter box: make a long, flat rectangle in brown for soil, and sew several plants onto it. Put it in a small wooden box.
- A terrarium: arrange plants in a glass bowl with real pebbles and sand. It looks just like a real terrarium.
- Fridge magnets: sew a rosette to a small magnet.
- Desk buddies: add tiny safety eyes and a smile to a cactus. See the crochet frog pattern for more about safety eyes.
For more plant-inspired decor, see the crochet plant hanger for real pots.
Colour ideas
Real succulents come in many colours. Wikipedia's article on echeveria shows a lovely range of rosettes.
- Classic echeveria: sage or blue-green, with pink tips.
- Purple rosette: dusty purple or lilac, for an "Afterglow" or "Perle von Nürnberg" look.
- Ghost plant: pale grey or silver.
- Golden cactus: bright green ribs with yellow spines.
- Flowering cactus: dark green with a coral, pink or yellow flower.
- Pots: terracotta, cream, grey, or white with a coloured stripe.
Changing the size
- Mini plants: use DK cotton and a 3 mm hook. Everything shrinks by about a quarter.
- Bigger rosette: add a fourth layer: R1 6 sc, R2 12, R3 (sc, inc) × 6 (18), R4 (2 sc, inc) × 6 (24), then 8 large petals over 3 stitches each.
- Taller cactus: start with ch 17 for 16 stitches. Make more rows for a wider cactus.
- Bigger pot: add rounds to the base: R6 (4 sc, inc) × 6 (36), then work the BLO round and the sides over 36 stitches.
Tips for neat succulents
- Work tightly. Firm stitches make crisp petals and hide the stuffing.
- Stuff firmly but evenly, a little at a time.
- Shape the petals with your fingers as you assemble the rosette.
- Stiffen the petals. For upright petals that stay curved, brush them with a mix of equal parts white glue and water and let them dry in shape.
- Hide ends inside the plants and pots.
- Count the rows of the cactus rectangle: an even number of rows makes a neater seam.
Common problems and fixes
The rosette petals are floppy. Use a smaller hook, or stiffen them as above.
The layers don't sit between each other. Turn each layer before you sew, so the petals of the upper layer fall in the gaps.
The cactus seam is visible. Turn the seam to the back, or work the seam with a slip stitch through the back loops only.
The pot is wobbly. Add weight to the bottom, and stuff the sides firmly.
The pot rim won't fold. Make sure round 14 is worked in the front loops only.
Frequently asked questions
Are crochet succulents good for beginners? Yes. They're small, quick and use basic stitches. The cactus is the easiest: just rows of single crochet.
How much yarn do I need? About 15 m (16 yd) for a rosette, 12 m (13 yd) for a cactus and 20 m (22 yd) for a pot with soil.
What yarn is best? Worsted cotton holds its shape best. Acrylic works too and comes in more greens.
Can I give crochet succulents to children? Without the pellets, stone or wire, the plants are soft and safe for older children. For babies and toddlers, embroider details instead of using small parts.
Can I sell succulents made from this pattern? Yes. You're welcome to sell the plants you make.
What to make next
- For a striking red flower, try the crochet poppy pattern.
- For a cheerful bloom, see the crochet sunflower pattern.
- To hold real plants, make a crochet plant hanger.
- For a gift with several flowers, see the crochet flower bouquet.
There are more free patterns in the flowers section.
Save it for later
Pin this to your Pinterest board so it's there when you're ready to stitch.

Keep stitching